
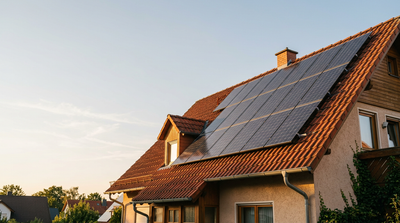



Du willst ein Balkonkraftwerk oder eine PV-Anlage anschließen, aber die MC4-Stecker passen nicht zwischen den Dachziegeln hindurch? Viele Anleitungen empfehlen, die Stecker abzuschneiden oder einen Spezialziegel zu setzen. Es geht auch anders: Das Kabel wird seitlich in eine Durchführung eingelegt, die Stecker bleiben dran.
Kurz beantwortet: Die NEXCAPE®-Durchführung hat seitliche Schlitze. Du legst das Solarkabel mitsamt MC4-Stecker ein und führst es an der Ziegelkante ins Dachinnere. Die Durchlässe sind für Solarkabel bis 7,5 mm Außendurchmesser ausgelegt, der Erdungsdurchlass für ein Erdungskabel bis 9 mm Außendurchmesser. Die Durchführung ist ein mechanischer Abriebschutz, kein Dichtelement. Die Dichtigkeit des Dachs übernimmt wie gewohnt die Dacheindeckung.

Das Problem: Der Stecker ist dicker als der Spalt
Beim Ziegeldach gibt es drei typische Hürden:
- MC4-Stecker sind dicker als das Kabel. Durch eine enge Öffnung passt das Kabel, der Stecker nicht.
- Stecker abschneiden kostet einen Arbeitsschritt. Danach muss die Steckverbindung neu und fachgerecht hergestellt werden.
- Spezialziegel kosten ein Vielfaches und müssen genau zu deinem Ziegelmodell passen. Was die Wege im Einzelnen kosten, steht im Kostenvergleich der fünf Wege.
Ohne Schutz liegt das Kabel direkt auf der Ziegelkante. Dort reibt es bei jeder Bewegung der Leitung an der Isolierung.
Die Lösung: seitlich einlegen statt durchfädeln
- MC4-Stecker bleiben montiert: Das Kabel wird seitlich in die Schlitze eingelegt, nicht durch ein Loch gefädelt.
- Abriebschutz an der Ziegelkante: Das flexible TPU liegt zwischen Kabel und Ziegel. Dafür ist die Durchführung gemacht.
- Kein Spezialziegel: Die Durchführung sitzt zwischen den vorhandenen Ziegeln.
- Gefertigt in Deutschland aus TPU.
Welche Ausführung und was sie kostet
Die Zahl im Variantennamen ist die Kabelanzahl, keine Stückzahl. Die Länge 105, 125 oder 150 mm ist die Länge der Durchführung, nicht die Breite eines Ziegels. Preise je Stück, zuerst mit 19 % MwSt., dahinter mit Nullsteuersatz nach § 12 Abs. 3 UStG. Stand 15.09.2026, live aus unserem Shop.
| Ausführung | Passt für | 105 mm | 125 mm | 150 mm |
|---|---|---|---|---|
| 2 Kabel | 2 Solarkabel bis 7,5 mm Außendurchmesser | 7,01 € / 5,89 € | 9,98 € / 8,39 € | 12,36 € / 10,39 € |
| 2 Kabel + Erdungskabel | 2 Solarkabel bis 7,5 mm, dazu 1 Erdungskabel bis 9 mm Außendurchmesser | 7,60 € / 6,39 € | 11,17 € / 9,39 € | 12,96 € / 10,89 € |
| 4 Kabel | 4 Solarkabel bis 7,5 mm Außendurchmesser | 8,79 € / 7,39 € | 11,77 € / 9,89 € | 14,74 € / 12,39 € |
| 4 Kabel + Erdungskabel | 4 Solarkabel bis 7,5 mm, dazu 1 Erdungskabel bis 9 mm Außendurchmesser | 9,98 € / 8,39 € | 13,55 € / 11,39 € | 15,34 € / 12,89 € |
| Zuleitung 9,5 mm | 1 Leitung bis 9,5 mm Außendurchmesser | 4,36 € / 3,66 € | 4,25 € / 3,57 € | 4,36 € / 3,66 € |
Alle Ausführungen findest du auf der Produktseite PV-Kabeldurchführung ohne Stecker-Demontage und im Überblick unter PV-Kabeldurchführungen. Entscheidend ist der Außendurchmesser mit Isolierung, nicht der Querschnitt in mm². Miss dein Kabel im Zweifel nach.
Welche Länge brauchst du?
Die passende Länge richtet sich nach der Überlappung deiner Dachziegel. Die hängt davon ab, wie der Dachdecker die Ziegel verlegt hat. Mehr Überlappung bedeutet eine längere Durchführung. Genau deshalb gibt es drei Längen. Wie du vorgehst, erklärt der Größen-Ratgeber. Im Zweifel schick ein Foto deiner Ziegeldeckung an support@nexcape.de.
Montage in drei Schritten
- Ziegel an der Durchtrittsstelle anheben.
- Kabel seitlich einlegen – die MC4-Stecker bleiben dran.
- Durchführung an der Ziegelkante positionieren und Ziegel wieder eindecken. Bei fast allen Ziegeltypen muss an der Durchtrittsstelle ein Stück vom Ziegel ausgeflext werden.
Aus unserem Support: zwei echte Fragen aus dem September 2026
„Welche Länge für die Ziegel in unserer Region?" Ein Installateur aus dem Raum München nannte uns als Hauptziegel in seinem Einzugsgebiet Braas Frankfurter Pfanne, Taunuspfanne, Harzer Normal und Harzer BIG, Erlus E58, Creaton MZ3 und Falzziegel. Bei so vielen Modellen lässt sich die Länge nicht pauschal vorab festlegen, weil sie von der Überlappung abhängt. Er bekam deshalb Muster in 105 mm und in 125 mm, um beide direkt auf seinen Dächern zu vergleichen. Seine Rückmeldung, welche Länge auf welchem Ziegel sitzt, steht noch aus. Für Erlus E58, Creaton MZ3 und Falzziegel haben wir bislang keine eigene Messung.
„Gibt es eine Durchführung für ein 11-mm-Kabel?" Ein Kunde fragte danach, weil die Variante mit 9,5 mm Zuleitungsdurchlass für seine Leitung zu eng war. Unsere Antwort: Die Serie ist für Solarkabel bis 7,5 mm und Erdungskabel bis 9 mm Außendurchmesser ausgelegt, die Zuleitungsvariante für 9,5 mm. Für größere Durchmesser gibt es keine Variante im Shop. Frag in diesem Fall individuell bei unserem Support an.
Häufige Fragen
Muss ich die MC4-Stecker abbauen? Nein. Das Kabel wird mitsamt den Steckern seitlich in die Durchführung eingelegt.
Welcher Kabeldurchmesser passt? Solarkabel bis 7,5 mm Außendurchmesser, Erdungskabel bis 9 mm Außendurchmesser. Für eine einzelne Leitung gibt es die Zuleitungsvariante mit 9,5 mm Durchlass. Größere Durchmesser bitte individuell beim Support anfragen.
Welche Länge brauche ich? Das hängt von der Überlappung deiner Dachziegel ab. Mehr Überlappung bedeutet eine längere Durchführung. Im Zweifel ein Foto an support@nexcape.de schicken.
Ersetzt die Durchführung die Abdichtung am Dach? Nein. Sie ist ein mechanischer Abriebschutz, kein Dichtelement. Die Dichtigkeit des Dachs übernimmt wie gewohnt die Dacheindeckung.
Muss am Ziegel etwas bearbeitet werden? Bei fast allen Ziegeltypen muss an der Durchtrittsstelle ein Stück vom Ziegel ausgeflext werden.
Was kostet die Durchführung? Ab 7,01 € je Stück inkl. 19 % MwSt. (2 Kabel, 105 mm), mit Nullsteuersatz ab 5,89 €. Die Zuleitungsvariante 9,5 mm gibt es ab 4,25 € bzw. 3,57 €. Stand 15.09.2026.
Fazit
Wer die MC4-Stecker nicht abschneiden und keinen Spezialziegel setzen will, legt das Kabel seitlich in eine Durchführung ein. Wichtig sind drei Punkte: der Außendurchmesser deiner Kabel, die Länge passend zur Überlappung und die Bearbeitung des Ziegels an der Durchtrittsstelle.
Weiterlesen: PV-Dachdurchführungen im Überblick · Durchführung ohne Stecker-Demontage · PV-Dachdurchführung 125 mm · PV-Dachdurchführung 150 mm · Größen-Ratgeber · PV-Kabel und Erdung gemeinsam führen · Was kostet der Weg durchs Ziegeldach?
Markenrechtshinweis: Genannte Produkt- und Markenbezeichnungen Dritter sind Eigentum der jeweiligen Inhaber. Die Nennung dient ausschließlich der Beschreibung der Produktkompatibilität (§ 23 MarkenG / Art. 14 EU-MarkenVO). Es besteht keine geschäftliche Verbindung zwischen NEXCAPE® (Roos Enterprises UG, Wildberg) und den genannten Herstellern.
![Frisches Gemüse Hydroponic anbauen: Dein kompletter Start-Guide [2025] - NEXCAPE](http://nexcape.de/cdn/shop/articles/frisches-gemuse-hydroponic-anbauen-dein-kompletter-start-guide-2025-478144.png?v=1745847549&width=1000)
